How to Generate a Complete Mobile App Wireframe From a Text Description Using AI
Table of Contents
ToggleWhat used to take a designer three days now takes a developer three hours. Here is exactly how.
Mobile app wireframing was one of the last parts of product development that genuinely felt like it required a designer. Writing code, generating APIs, building components — all accelerated by AI. But wireframing — the visual thinking work of designing navigation flows, screen layouts, and user interactions before a component is built — that still felt like it required someone with specific design instincts.
That is no longer true.
A developer who knows how to communicate a mobile app concept through structured text can now use AI tools to generate complete wireframe specifications — screen by screen, component by component, interaction by interaction — detailed enough to build from directly. No designer needed for the initial layout. No back-and-forth for the first draft.
This is not a tool that does design for you. It translates your product thinking into the visual structure that design and development depend on — faster than the traditional process and more complete than most manual wireframing sessions achieve.
This blog walks through the exact process: how to structure the text description, which AI tools handle each stage, and how to go from a paragraph describing your app idea to a screen-by-screen wireframe a developer can build against.
AI Integrated Digital Marketing Training
Build practical skills in SEO, Google Ads, Social Media Marketing, Analytics, Content Marketing, and AI-powered workflows through projects, live classes, internship exposure, and industry-focused learning.
The right understanding before you start
The biggest misconception about AI-assisted wireframing is that you describe an app and AI produces a wireframe. The quality of what comes back is determined entirely by the quality of what goes in — and for most developers starting this process, the input is not specific enough.
“A food delivery app with a home screen and checkout” will produce something. It will look like every other food delivery wireframe the AI has seen. It will not reflect your specific product decisions, your navigation model, or your differentiating features.
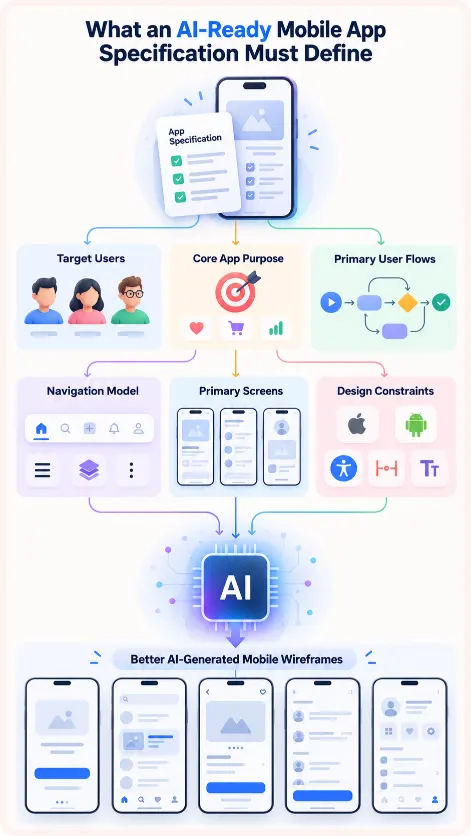
The description that produces a useful, specific wireframe makes product decisions explicit before asking the AI to visualise them. What is the navigation model? How many primary screens are there? What is the user flow from onboarding to core action? What is the information hierarchy on each key screen?
These decisions must be made by you. AI visualises decisions that have already been made. It cannot make them for you and produce something that means anything specific to your actual product.
The workflow in this blog is built around that principle: make the product decisions first, then use AI to generate the visual specification that encodes them.
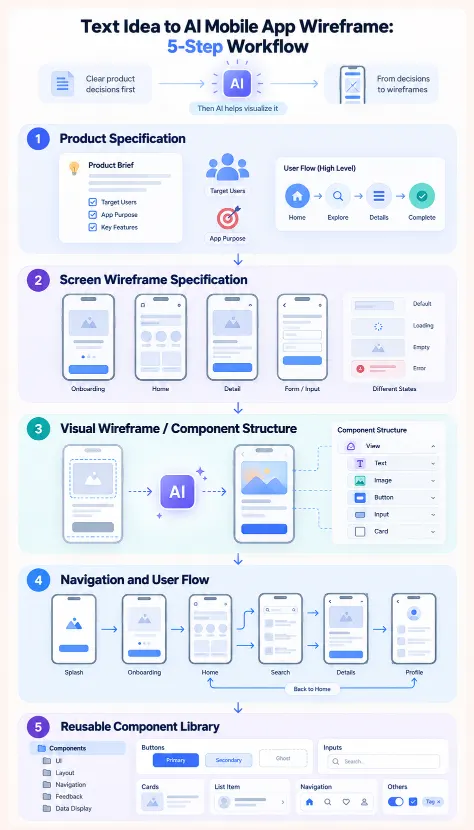
Step 1: write the product specification prompt
Before any wireframe is generated, write a structured product specification:
I am building a mobile app called [App Name] for [target users].
Core purpose: [one sentence describing what the app does]
Primary user flows:
[First core flow, e.g. "New user onboarding: welcome screen → sign up → profile setup → home"]
[Second core flow, e.g. "Core feature usage: browse → select → configure → confirm → track"]
[Third core flow, e.g. "Settings and account management"]
Navigation model: [Bottom tab bar with X tabs / Drawer navigation / Stack navigation only]
Primary screens (list every screen by name):
- [Screen 1 name]: [one line describing its purpose]
- [Screen 2 name]: [one line describing its purpose]
[continue for all screens]
Key design constraints:
- Target platform: [iOS / Android / both]
- [Any brand colors or visual identity requirements]
- [Any accessibility requirements]
- [Any specific component patterns to use or avoid]
This establishes the product decisions the design will encode. The AI’s response forms the foundation of everything that follows — possibly with clarifying questions before proceeding.
Step 2: generate the screen-by-screen wireframe specification
With the product specification confirmed, generate a textual wireframe specification for each screen — precise enough that a developer can build from it without seeing a visual:
Based on the product specification, generate a complete wireframe specification
for all [X] screens in [App Name].
For each screen:
**Screen name** (navigation context: which tab/stack)
Layout structure:
- Header/nav bar: [contents]
- Main content area: [scrollable or fixed, contents]
- Bottom area: [tab bar / action button / empty]
Content elements (top to bottom):
- [Element]: [type — text/image/button/input/list/card], [content or placeholder]
Interactive elements:
- [Element]: [what happens on tap — navigation target or action]
States:
- Empty state: [what shows with no data]
- Loading state: [how loading is shown]
- Error state: [how errors are communicated]
The output is a complete textual wireframe — every screen defined in terms of layout, content hierarchy, interactive elements, and states. A developer reading it knows exactly what to build.
AI Integrated Full Stack Development Training
Master HTML, CSS, JavaScript, React, Node.js, Express.js, MongoDB, REST APIs, and AI-powered development workflows through live coding, practical projects, internship opportunities, and career-focused training.
Step 3: generate visual wireframes using AI image tools
With a complete textual specification, two paths to visual wireframes are available.
Path A: Figma AI and design tool plugins. Uizard, Framer AI, and Magician for Figma accept text descriptions and generate visual wireframes you can directly edit. Paste the specification for each screen and generate the initial layout — a low-fidelity wireframe to refine rather than build from scratch.
Prompt structure for each screen:
Create a mobile app screen wireframe for: [Screen Name]
Layout: [portrait mobile, iOS/Android style]
Elements to include, top to bottom:
- [Navigation bar with back button and title: "[Screen Title]"]
- [Hero section: [description]]
- [Section 1: [description of content block]]
- [List of [X] items, each with [icon, title, subtitle, arrow]]
- [Primary action button at bottom: "[Button Label]"]
Style: minimal wireframe, no color, use standard mobile UI conventions
Path B: React Native component structure directly. For developers building in React Native, bypassing the visual wireframe and going straight to a component structure specification is often faster:
Based on this screen wireframe specification for [Screen Name]:
[paste the textual specification]
Generate a React Native component structure including:
- The parent screen component with its layout
- A list of child components to create with their props
- The navigation configuration for this screen
- Any FlatList or ScrollView structure needed
- Placeholder data objects showing the shape of data each component expects
Use React Navigation stack and bottom tab structure as established
in the product specification.
This produces a component tree immediately buildable in React Native — skipping the visual wireframe step entirely.
Step 4: generate the navigation map and user flow
Beyond individual screens, generate the complete navigation map:
Based on all screens and interactive elements in the wireframe specification:
- Complete navigation map: every screen → screens it navigates to and conditions
(e.g. "Login → Home [on success] | Login → Password Reset ['Forgot Password' tap]")
- All navigation events:
- Source screen, trigger element and interaction, destination screen, data passed between screens
- React Navigation configuration for the entire app:
- bottom tab navigator, all stack navigators, initial route per navigator
- Shared state needed across screens
- (auth state, cart, user profile, etc.)
This produces the navigation infrastructure that ties all screens together — the part of wireframing most commonly left vague early and most commonly causing rework when the navigation model does not support the intended flow.
Step 5: generate the component library specification
The final step generates the component library that the wireframe implies:
Based on the wireframe specification for all screens in [App Name],
identify all reusable components and generate a component library specification.
For each reusable component:
- Component name (following React Native naming conventions)
- Description of its purpose
- Props it accepts (name, type, required/optional, default value)
- States it needs to handle (default, loading, error, disabled, selected)
- Which screens it appears on
- Any variants it needs (e.g. primary/secondary button, large/small card)
Also identify:
- Any third-party component libraries that would accelerate development
(e.g. react-native-elements, react-native-paper)
- Any custom animations or transitions needed
- Platform-specific adaptations required for iOS vs Android
This transforms the wireframe from a screen-level specification into a component-level one — the document a React Native developer actually builds from, because React Native development is component-first, not screen-first.
AI Integrated React Native Mobile App Development Training
Build a job-ready mobile app development profile through practical coding, industry-style projects, AI-assisted workflows, career preparation, mentor-guided learning, real-world app deployment, API integration, and hands-on portfolio development.
How Learn2Earn Labs trains mobile app developers to work this way
At Learn2Earn Labs, the React Native Mobile App Development program does not treat wireframing and development as separate phases. From the first week, students learn to think about mobile apps at the intersection of product decisions, visual structure, and component architecture — and to use AI to generate the specifications that connect all three.
The five-step workflow in this blog is the method by which every live project in the program is built. By the time a student builds their capstone, they are not starting from a blank file. They are starting from a complete, AI-generated specification that they have verified, refined, and fully understood — building with the confidence of a developer who knows exactly what each screen, component, and navigation transition needs to do.
Career counselling prepares students to present this workflow in portfolio reviews and interviews — because the ability to take a product idea from text description to buildable specification is exactly the end-to-end thinking that distinguishes candidates who contribute immediately from those who need a design file handed to them first.
With alumni placed at TCS, Accenture, Cognizant, Infosys, and Nagarro, and with decades of experience shaping developer careers across India, Learn2Earn Labs trains every student to operate at the full product development lifecycle.
Visit learntoearnlabs.com or write to team@learntoearnlabs.com
Conclusion
A text description of a mobile app is now enough to generate a complete, buildable wireframe specification — screen by screen, component by component, navigation flow by flow. The process takes three to four hours for a moderately complex application. The equivalent traditional process takes days.
What AI cannot do is make the product decisions. What app to build, who it is for, what the core user flow is, what information lives on each screen — these require human judgment. AI visualises and structures decisions that have already been made.
Make the decisions clearly. Structure them in a prompt. Let AI generate the specification. Then build.
Frequently Asked Questions
These FAQs are intentionally written around questions that can strengthen both traditional SEO and AI/GEO retrieval because they answer specific user intents directly.
1. Can AI generate a complete mobile app wireframe from a text description?
Yes. AI can turn a structured mobile app description into a screen-by-screen wireframe specification covering layouts, content hierarchy, interactive elements, navigation and different interface states. The quality of the result depends heavily on how clearly the app requirements and product decisions are defined before generation. Blog – 37
2. What information should I give AI before generating a mobile app wireframe?
Define the app’s target users, core purpose, primary user flows, navigation model, required screens and important design constraints. You can also specify the target platform, accessibility requirements, branding requirements and UI patterns that should be used or avoided. Blog – 37
3. Which AI tools can generate visual mobile app wireframes?
The article identifies tools such as Uizard, Framer AI and Magician for Figma as options for turning text-based screen specifications into editable visual wireframes. A structured specification for each screen generally produces better results than a short generic description. Blog – 37
4. Can developers generate React Native components directly instead of creating visual wireframes?
Yes. React Native developers can use the textual wireframe specification to generate a component structure containing parent and child components, props, navigation configuration, lists or scrolling structures and placeholder data. This can allow developers to move from specification to implementation without creating a separate visual wireframe first. Blog – 37
5. Can AI decide the complete mobile app design automatically?
AI can help visualise and structure product decisions, but it should not replace product judgment. Decisions such as who the app serves, its core user flow, navigation structure, screen hierarchy and information architecture should be defined first. AI is most useful for translating those decisions into a structured wireframe and development specification.